
Table of Contents
Are you looking for a fast and easy way to provide custom business logic to your Agents without having to couple the function call to the Agent code? The Azure AI Agent Service is here to help with its Azure Functions integration!
The Azure AI Agent Service integrates with Azure Functions, enabling you to create intelligent, event-driven applications with minimal overhead. This combination allows AI-driven workflows to leverage the scalability and flexibility of serverless computing, making it easier to build and deploy solutions that respond to real-time events or complex workflows.
Let’s assume you work for an organization that has lots of active projects, and you want to create an AI Agent who can answer questions about and act upon those projects. You probably have a project management system, but it’s custom and would require custom code to access project information. You could build an entirely new application just to support this, or you could create a few Azure Functions to expose access to your project management system and provide those to an AI Agent so that it can decide what information it needs when it needs it to fulfill its tasks.
In this walkthrough, we’ll show how easy it can be to setup Azure AI Foundry with AI Agent Service to leverage Azure Functions.
Setting things up in your Azure Subscription
First, you’ll need access to an Azure Subscription. We’ll use the Azure CLI to help us quickly provision resources needed. We’ll use the Azure Functions Core Tools to deploy code to our provisioned Function App.
Let’s make sure we have all the pieces in place. At a high-level, we’ll need:
- An Azure AI Hub and Project to manage the Agents
- An Azure Function App with our business logic implementation
- An Azure Storage Account for our Queues to manage triggering function code and responding to the agent
- Azure RBAC Role Assignments for our resources to make sure the identities of our components have the right permissions
Security points
Rather than passing around keys, we’ll use identities and role-based access control (RBAC) to ensure resources have the correct permissions to do what they need to do.
| Identity | Target Resource | Role Required |
|---|---|---|
| Azure AI Project | Storage Account | Storage Queue Data Contributor |
| AI Search Service | Search Index Data Contributor | |
| Search Service Contributor | ||
| AI Services | Cognitive Services Contributor | |
| Cognitive Services OpenAI User | ||
| Cognitive Services User | ||
| Azure Function App | Storage Account | Storage Blob Data Owner |
| Storage Queue Data Contributor | ||
| Storage Table Data Contributor |
You will need to be able to create these role assignments, so you will need to be an Owner of either the subscription or the resource group in which the resources are being created. Alternatively, you can request the role assignments be created by someone with permissions to create role assignments in your organization.
Next, we’ll setup a few things and make sure we have a spot to drop all of our resources.
Setup your tools, environment variables, and Resource Group
1
2
3
4
5
6
7
8
9
10
11
12
13
14
15
16
17
18
19
20
21
22
23
24
25
26
27
28
29
30
31
32
33
34
35
36
37
38
# Install the `ml` extension for Azure CLI

az extension add -n ml
az extension update -n ml

# Setup some variables

SUBSCRIPTION_ID=$(az account show --query id -o tsv)
RESOURCE_GROUP="rg-agents-and-functions-demo"
LOCATION="eastus2"
SUFFIX=$(cksum <<< "${RESOURCE_GROUP}${SUBSCRIPTION_ID}" | cut -f 1 -d ' ')

KEY_VAULT_NAME="kv-aaf-${SUFFIX}"
STORAGE_ACCOUNT_NAME="staaf${SUFFIX}"
AI_SERVICES_NAME="ai-aaf-${SUFFIX}"
AI_SEARCH_NAME="search-aaf-${SUFFIX}"

HUB_NAME="aaf-demo-hub"
PROJECT_NAME="aaf-demo-project"
AI_SERVICES_CONNECTION_NAME="ai-services-connection"
AI_SEARCH_CONNECTION_NAME="ai-search-connection"
STORAGE_CONNECTION_NAME="${PROJECT_NAME}/workspaceblobstore"
CAPABILITY_HOST_NAME="ch-${SUFFIX}"

FUNCTION_APP_ID_NAME="id-func-aaf-${SUFFIX}"
FUNCTION_APP_NAME="func-aaf-${SUFFIX}"

INPUT_QUEUE_NAME="project-status-request"
OUTPUT_QUEUE_NAME="project-status-response"

#
# Create the resource group
#
# This will hold all of the resources used for this walkthrough. When
# you want to clean up, just delete this and everything within it
# will also be deleted.

az group create -n $RESOURCE_GROUP -l $LOCATION
AI Hub and Project
You can use several methods to create an Azure AI Project. To see how to create projects using the Azure AI Foundry portal or Python SDK, please review the docs.
While our goal is to create the Hub/Project, they depend on several resources to be able to work as expected. Generally, an AI Hub requires an Azure Storage Account and an Azure Key Vault. You can also add an Application Insights reference if you’d like to enable some built-in logging and monitoring capabilities. If you create a Hub without specifying these, they will be created for you.
Because we’re building out all of these pieces in support of a demo, we’ll use a single Storage Account for all of our dependent resources – th AI Hub, Azure Function App, and integration will all share it.
The AI Agent service & Function integration requires use of the Standard Agent type. To create a Standard Agent, the AI Project will need access to a Storage Account, Azure AI Services with OpenAI support (type AIServices), and an Azure AI Search service. You may also optionally bring an Azure Cosmos DB instance to store thread data. These connections need to be created at the AI Hub or Project level, and you then add a Capability Host to both the AI Hub and Project. The Capability Host at the Project requires references to the connection name for the three required components. Without a Capability Host, you cannot use the tools for the AI Agent service. While the Functions integration tool may not need all of these components, the Standard Agent type requires they be in place since it supports other tools that may need them.
Create the required dependencies
1
2
3
4
5
6
7
8
9
10
11
12
13
14
15
16
17
18
19
20
21
22
23
24
25
26
27
28
29
30
31
32
33
34
35
36
37
38
39
40
41
42
43
44
45
46
47
48
49
50
51
52
53
54
55
56
57
58
#
# Create the Key Vault
#

az keyvault create \
--resource-group $RESOURCE_GROUP \
--location $LOCATION \
--name $KEY_VAULT_NAME

#
# Create the Storage Account
#

az storage account create \
--resource-group $RESOURCE_GROUP \
--location $LOCATION \
--name $STORAGE_ACCOUNT_NAME \
--sku Standard_LRS

#
# Create the AI Services resource
#
# This will be used by the Hub/Project to handle interactions with
# OpenAI models and inferencing endpoints. The `custom-domain`
# argument creates a resource-specific endpoint as opposed to a
# general location-specific endpoint.

az cognitiveservices account create \
--resource-group $RESOURCE_GROUP \
--location $LOCATION \
--name $AI_SERVICES_NAME \
--kind AIServices \
--custom-domain $AI_SERVICES_NAME \
--sku S0 \
--yes

# Deploy an OpenAI model to your AI Services account

az cognitiveservices account deployment create \
--resource-group $RESOURCE_GROUP \
--name $AI_SERVICES_NAME \
--deployment-name gpt-4o-mini \
--model-name gpt-4o-mini \
--model-version 2024-07-18 \
--model-format OpenAI \
--sku-name GlobalStandard \
--sku-capacity 50

#
# Create the AI Search resource
#
# While the Azure Functions tool doesn't require AI Search, the
# capabilities host requires a vector store connection.

az search service create \
--resource-group $RESOURCE_GROUP \
--name $AI_SEARCH_NAME \
--sku Standard
Note: some of these commands can take a long time to complete. Comments have been added when longer execution times are expected, but some may have been missed. When possible, we store the output in a local variable to reduce additional calls back to the service.
Create the Hub and connections
1
2
3
4
5
6
7
8
9
10
11
12
13
14
15
16
17
18
19
20
21
22
23
24
25
26
27
28
29
30
31
32
33
34
35
36
37
38
39
40
41
42
43
44
45
46
47
48
49
50
51
52
53
54
55
56
57
58
59
60
61
62
63
64
65
66
67
68
69
70
71
72
73
74
75
76
77
78
#
# Create the AI Hub
#
# Save the response because subsequent `az ml workspace show` calls
# can be very slow.
# Note: this may take up to 10 minutes.

STORAGE_ACCOUNT_RESOURCE_ID=$(az storage account show -g $RESOURCE_GROUP -n $STORAGE_ACCOUNT_NAME --query id -o tsv)

HUB_DETAILS=$(az ml workspace create \
--resource-group $RESOURCE_GROUP \
--name $HUB_NAME \
--kind hub \
--key-vault $(az keyvault show -g $RESOURCE_GROUP -n $KEY_VAULT_NAME --query id -o tsv) \
--storage-account $STORAGE_ACCOUNT_RESOURCE_ID)

#
# Create Connections for AI Hub
#
# The specification for the service connections does not explicitly
# require all of the metadata to be set; however, this walkthrough
# attempts to create a target state of the resources as close as
# possible to the Standard Agent setup template which explicitly sets
# the ApiType and location values in addition to the required settings.
# While the metadata property is not documented in the Azure ML CLI
# v2 docs for the YAML file inputs, it is supported.
# Note: if the connections are not setup correctly, it will not
# necessarily err out, but attempts to create the AI Project
# Capability Host or Agent later will fail.

# Connect AI Services to your Hub

AI_SERVICES_ENDPOINT=$(az cognitiveservices account show -n $AI_SERVICES_NAME -g $RESOURCE_GROUP --query properties.endpoint -o tsv)
AI_SERVICES_RESOURCE_ID=$(az cognitiveservices account show -n $AI_SERVICES_NAME -g $RESOURCE_GROUP --query id -o tsv)


cat <<EOF > connection-spec-ai-services.yaml
name: ${AI_SERVICES_CONNECTION_NAME}
type: azure_ai_services
endpoint: ${AI_SERVICES_ENDPOINT}
ai_services_resource_id: ${AI_SERVICES_RESOURCE_ID}
metadata:
  ApiType: Azure
  location: $LOCATION
EOF

az ml connection create \
--resource-group $RESOURCE_GROUP \
--workspace-name $HUB_NAME \
--file connection-spec-ai-services.yaml

# Connect AI Search to your Hub

AI_SEARCH_RESOURCE_ID=$(az search service show -g $RESOURCE_GROUP -n $AI_SEARCH_NAME --query id -o tsv)

cat <<EOF > connection-spec-ai-search.yaml
name: ${AI_SEARCH_CONNECTION_NAME}
type: azure_ai_search
endpoint: https://${AI_SEARCH_NAME}.search.windows.net/
metadata:
  ApiType: Azure
  ResourceId: ${AI_SEARCH_RESOURCE_ID}
  location: ${LOCATION}
EOF

az ml connection create \
--resource-group $RESOURCE_GROUP \
--workspace-name $HUB_NAME \
--file connection-spec-ai-search.yaml

#
# Add Capability Host to the Hub
#

az ml capability-host create \
--resource-group $RESOURCE_GROUP \
--workspace-name $HUB_NAME \
--name hub-$CAPABILITY_HOST_NAME
Create the Project
1
2
3
4
5
6
7
8
9
10
11
12
13
14
15
16
17
18
19
20
21
22
23
24
25
26
27
28
29
30
31
32
33
34
35
36
37
38
39
40
41
42
43
44
45
46
47
48
49
50
51
52
53
54
55
56
57
58
59
60
61
62
63
64
65
66
67
68
69
70
71
72
73
74
75
76
77
78
79
80
81
82
83
84
85
#
# Create the AI Project
#
# Save the response because subsequent `az ml
# workspace show` calls can be very slow.
# Note: this may take up to 10 minutes.

HUB_RESOURCE_ID=$(echo $HUB_DETAILS | jq -r '.id')

PROJECT_DETAILS=$(az ml workspace create \
--resource-group $RESOURCE_GROUP \
--hub-id $HUB_RESOURCE_ID \
--name $PROJECT_NAME \
--kind project)

#
# Add the Capability Host to the Project
#
# A couple of things happening here...
# 1) Using a file because a single entry throws a list validation
#    error when passing these arguments directly.
# 2) When the AI Services Connection is added to the Hub, it creates
#    two -- one for general AI Services, and a second specific to
#    Azure OpenAI with the name '${AI_SERVICES_CONNECTION_NAME}_aoai'.
#    The Project capability host requires the Azure OpenAI flavor of
#    the connection, so we'll set it here to have the conventional
#    postfix. (This secondary "aoai" AI Services connection is also
#    visible in the portal or with `az ml connection list`. If it
#    isn't available, there must have been an issue adding the AI
#    services connection to the Hub.)

cat <<EOF > capability-host-project-spec.yaml
name: project-$CAPABILITY_HOST_NAME
ai_services_connections:
- ${AI_SERVICES_CONNECTION_NAME}_aoai
vector_store_connections:
- $AI_SEARCH_CONNECTION_NAME
storage_connections:
- $STORAGE_CONNECTION_NAME
EOF

az ml capability-host create \
--resource-group $RESOURCE_GROUP \
--workspace-name $PROJECT_NAME \
--file capability-host-project-spec.yaml

#
# Assign roles to AI Project identity
#

AI_PROJECT_PRINCIPAL_ID=$(echo $PROJECT_DETAILS | jq -r '.identity.principal_id')

# Roles for AI Search

az role assignment create \
--role "Search Index Data Contributor" \
--assignee-object-id $AI_PROJECT_PRINCIPAL_ID \
--assignee-principal-type ServicePrincipal \
--scope $AI_SEARCH_RESOURCE_ID

az role assignment create \
--role "Search Service Contributor" \
--assignee-object-id $AI_PROJECT_PRINCIPAL_ID \
--assignee-principal-type ServicePrincipal \
--scope $AI_SEARCH_RESOURCE_ID

# Roles for AI Services

az role assignment create \
--role "Cognitive Services Contributor" \
--assignee-object-id $AI_PROJECT_PRINCIPAL_ID \
--assignee-principal-type ServicePrincipal \
--scope $AI_SERVICES_RESOURCE_ID

az role assignment create \
--role "Cognitive Services OpenAI User" \
--assignee-object-id $AI_PROJECT_PRINCIPAL_ID \
--assignee-principal-type ServicePrincipal \
--scope $AI_SERVICES_RESOURCE_ID

az role assignment create \
--role "Cognitive Services User" \
--assignee-object-id $AI_PROJECT_PRINCIPAL_ID \
--assignee-principal-type ServicePrincipal \
--scope $AI_SERVICES_RESOURCE_ID
At this point, we’ve got a lot of resources to get everything up and running! Your resource group should include:
- Dependencies:
- Storage Account
- auto-created Event Grid System Topic
- Key Vault
- AI Services
- gpt-4o-mini model deployment
- AI Search
- Storage Account
- AI Hub
- AI Project
You can check by running az resource list -g $RESOURCE_GROUP -o table or looking in the Azure Portal.
All that’s left is the Function App, code, and some more role assigments.
Azure Function
For ease of deployment, a test function implementation has been provided in the Awkward Industries GitHub Repository awkwardindustries/agents-and-functions-blog under the Function app implementation (src/functions). If you have your own, feel free to use it!
1
2
3
4
5
6
7
8
9
10
11
12
13
14
15
16
17
18
19
20
21
22
23
24
25
26
27
28
29
30
31
32
33
34
35
36
37
38
39
40
41
42
43
44
45
46
47
48
49
50
51
52
53
54
55
56
57
58
59
60
61
62
63
64
65
66
67
68
69
70
71
72
73
74
75
76
77
78
79
80
81
82
83
84
85
86
87
88
89
90
91
92
93
#
# Create the Storage Queues
#
# Using our shared Storage Account, we'll create an input and output
# queue. The Function is triggered when the Agent drops a message on
# the input queue, and the response is dropped by the Function onto
# the output queue for the Agent to pick up.

az storage queue create --account-name $STORAGE_ACCOUNT_NAME -n $INPUT_QUEUE_NAME
az storage queue create --account-name $STORAGE_ACCOUNT_NAME -n $OUTPUT_QUEUE_NAME

QUEUE_SERVICE_ENDPOINT=$(az storage account show -g $RESOURCE_GROUP -n $STORAGE_ACCOUNT_NAME --query primaryEndpoints.queue -o tsv)

#
# Create the Function App
#
# We'll specify the identity for the Function App. We'll also apply
# known app settings required by the application after we create the
# Function App.

# Create a managed identity for the Function App

az identity create \
--resource-group $RESOURCE_GROUP \
--name $FUNCTION_APP_ID_NAME

# Create the Function App

az functionapp create \
--resource-group $RESOURCE_GROUP \
--flexconsumption-location $LOCATION \
--name $FUNCTION_APP_NAME \
--runtime python \
--runtime-version 3.11 \
--storage-account $STORAGE_ACCOUNT_NAME \
--assign-identity "$(az identity show -g $RESOURCE_GROUP -n $FUNCTION_APP_ID_NAME --query id -o tsv)"

# Apply required application settings

az functionapp config appsettings set \
--resource-group $RESOURCE_GROUP \
--name $FUNCTION_APP_NAME \
--settings \
AzureWebJobsStorage__clientId=$(az identity show -g $RESOURCE_GROUP -n $FUNCTION_APP_ID_NAME --query clientId -o tsv) \
STORAGE_QUEUES_CONNECTION__clientId=$(az identity show -g $RESOURCE_GROUP -n $FUNCTION_APP_ID_NAME --query clientId -o tsv) \
STORAGE_QUEUES_CONNECTION__credential=managedidentity \
STORAGE_QUEUES_CONNECTION__queueServiceUri=$QUEUE_SERVICE_ENDPOINT \
AZURE_CLIENT_ID=$(az identity show -g $RESOURCE_GROUP -n $FUNCTION_APP_ID_NAME --query clientId -o tsv) \
AZURE_AI_PROJECT_CONNECTION_STRING="${LOCATION}.api.azureml.us;${SUBSCRIPTION_ID};${RESOURCE_GROUP};${PROJECT_NAME}"

#
# Deploy the Function application to the Function App
#
# This step is easiest with the Azure Functions Core Tools. We'll
# clone the code and directly push it to Azure using the tool.

git clone https://github.com/awkwardindustries/agents-and-functions-blog.git
cd agents-and-functions-blog/src/functions

func azure functionapp publish $FUNCTION_APP_NAME --python

#
# Assign roles to Function App identity and AI Project identity for
# Storage Account access
#

FUNCTION_APP_PRINCIPAL_ID=$(az identity show -g $RESOURCE_GROUP -n $FUNCTION_APP_ID_NAME --query principalId -o tsv)

# Roles for the Storage Account

az role assignment create \
--role "Storage Queue Data Contributor" \
--assignee-object-id $AI_PROJECT_PRINCIPAL_ID \
--assignee-principal-type ServicePrincipal \
--scope $STORAGE_ACCOUNT_RESOURCE_ID

az role assignment create \
--role "Storage Blob Data Owner" \
--assignee-object-id $FUNCTION_APP_PRINCIPAL_ID \
--assignee-principal-type ServicePrincipal \
--scope $STORAGE_ACCOUNT_RESOURCE_ID

az role assignment create \
--role "Storage Queue Data Contributor" \
--assignee-object-id $FUNCTION_APP_PRINCIPAL_ID \
--assignee-principal-type ServicePrincipal \
--scope $STORAGE_ACCOUNT_RESOURCE_ID

az role assignment create \
--role "Storage Table Data Contributor" \
--assignee-object-id $FUNCTION_APP_PRINCIPAL_ID \
--assignee-principal-type ServicePrincipal \
--scope $STORAGE_ACCOUNT_RESOURCE_ID
Azure AI Standard Agent
Azure Functions as a knowledge tool requires the [Standard Agent] setup. Unfortunately this is currently only fully supported in either the REST SDK or Python SDK. For ease of scripting, we’ll use the Azure CLI’s az rest commands to proxy requests for the REST SDK to ensure setup of the Standard Agent.
1
2
3
4
5
6
7
8
9
10
11
12
13
14
15
16
17
18
19
20
21
22
23
24
25
26
27
28
29
30
31
32
33
34
35
36
37
38
39
40
41
42
43
44
45
46
47
48
49
50
51
52
53
54
55
56
57
58
59
60
#
# Setup required variables
#
# This is hardcoded convention from documentation to use the discovery_url for
# the hostname, and then build out the full URL to get the URL for the AI Agent.
DISCOVERY_URL=$(echo $PROJECT_DETAILS | jq -r '.discovery_url')
AI_AGENT_ENDPOINT="${DISCOVERY_URL%/*}/agents/v1.0/subscriptions/$SUBSCRIPTION_ID/resourceGroups/$RESOURCE_GROUP/providers/Microsoft.MachineLearningServices/workspaces/$PROJECT_NAME"
API_VERSION=2024-12-01-preview

#
# Create an Agent and save the ID
#
# Note: Although the sample includes two functions, we're only
# integrating with one for this walkthrough.

cat <<EOF > new-agent-body.json
{
  "name": "agents-and-functions-cli-agent",
  "model": "gpt-4o-mini",
  "instructions": "You are a helpful assistant that provides answers about company projects.",
  "tools": [
    {
      "type": "azure_function",
      "azure_function": {
        "function": {
          "name": "GetProjectStatus",
          "description": "Get the current project status for provided project.",
          "parameters": {
            "type": "object",
            "properties": {
              "Project": {"type": "string", "description": "The project whose status is requested."}
            },
            "required": ["Project"]
          }
        },
        "input_binding": {
          "type": "storage_queue",
          "storage_queue": {
            "queue_service_endpoint": "$QUEUE_SERVICE_ENDPOINT",
            "queue_name": "$INPUT_QUEUE_NAME"
          }
        },
        "output_binding": {
          "type": "storage_queue",
          "storage_queue": {
            "queue_service_endpoint": "$QUEUE_SERVICE_ENDPOINT",
            "queue_name": "$OUTPUT_QUEUE_NAME"
          }
        }
      }
    }
  ]
}
EOF

AGENT_ID=$(az rest --method post \
--resource "https://ml.azure.com/" \
--url $AI_AGENT_ENDPOINT/assistants?api-version=$API_VERSION \
--body @new-agent-body.json \
--query id --output tsv)
How’s this working?
The request/response pattern between the Agent and Function is managed by Storage Account Queues. When an Agent determines it needs to invoke a Function to help do its job (based on the specification provided at tool definition), it places a message on the specified inbound queue to trigger the Function. When the function is finished, it drops a message on the specified outbound queue to notify the Agent its job is complete.
Agent threads continuously poll the outbound queue for responses. The CorrelationId is important because it ensures the correct Agent thread is processing the response intended for it and enables an asynchronous request-response pattern. If this isn’t included, the Agent thread will think it never received a response because it’s checking messages for that ID. If an Agent thread dequeues a messsage with an unexpected CorrelationId, it will release the lease for the message assuming a different Agent thread with matching CorrelationId will dequeue it.
Understanding the flow
For the typical path, the experience should flow as follows:
sequenceDiagram
    participant Agent
    participant Inbound Queue
    participant Outbound Queue
    participant Function

    Function-->>Inbound Queue: Start polling for work
    Agent->>Inbound Queue: Enqueue message with CorrelationId = `abc`
    Agent-->>Outbound Queue: Start polling for `abc` response
    Function->>Inbound Queue: Work triggered for `abc`
    Function->>Outbound Queue: Work finished for `abc`
    Agent->>Outbound Queue: Checking for `abc`...matched. All done!
Let’s take a minute…
and talk about how queue receive modes and delivery counts work and why that might be a problem in some cases.
It may be possible that your response doesn’t make it because too many other Agent threads have checked it before it was picked up by the correct Agent thread. Storage Account Queues use a Peek & Lease receive mode with a default DequeueCount of five. This means that the first message in the queue will be delivered to a recipient with a lease, but it’s up to the recipient to tell the queue that it’s handled or needs to remain in the queue. If it remains, it may be delivered under a lease to a recipient at most five times.
Why would you possibly return it to the queue? Well, lots of reasons. You might have hit an unexpected error and don’t want to lose that message. In this case, an Agent thread might look at it to see if it’s for them using the CorrelationId and put it back so that it’s available for the other Agent thread(s).
If you scale to 10 concurrent Agent threads that all happen to need to make a Function call at the same time, it’s possible that multiple non-matching Agent threads might look at a response (dequeue it) and release it back to the queue if it’s not for them – each check incrementing the total dequeue count. Once five is hit, the Storage Account Queue will then move the message to a poison queue for review and the Agent thread would never receive the response.
A Service Bus Queue with message sessions enabled would help address this issue. In effect, the CorrelationId could be used as the session ID ensuring that the responses are being dequeued only by the Agent thread with that CorrelationId instead of peeking and checking each message to see if the CorrelationId matches.
Unfortunately, integration with Service Bus Queues and message sessions is not currently supported, so until it is – if you’re noticing issues with lots of concurrent Agent threads, keep an eye on your Storage Queue to make sure you don’t get a poison outbound queue.
Looking at the slightly more complex path, multiple Agent threads flows might look a little different based on when the Function completes, which Agent polls first, etc. Here’s a more complex example:
sequenceDiagram
    participant Agent Thread 1
    participant Agent Thread 2
    participant Inbound Queue
    participant Outbound Queue
    participant Function

    Function-->>Inbound Queue: Start polling for work
    activate Agent Thread 1
    Agent Thread 1->>Inbound Queue: Enqueue message with CorrelationId = `abc`
    Agent Thread 1-->>Outbound Queue: Start polling for `abc` response
    Function->>Inbound Queue: Work triggered for `abc`
    activate Agent Thread 2
    Agent Thread 2->>Inbound Queue: Enqueue message with CorrelationId = `xyz`
    Agent Thread 2-->>Outbound Queue: Start polling for `xyz` response
    Function->>Inbound Queue: Work triggered for `xyz`
    Function->>Outbound Queue: Work finished for `xyz`
    Agent Thread 1--xOutbound Queue: Checking for `abc`... no match.
    Agent Thread 2->>Outbound Queue: Checking for `xyz`... matched. All done!
    deactivate Agent Thread 2
    Function->>Outbound Queue: Work finished for `abc`
    Agent Thread 1->>Outbound Queue: Checking for `abc`... matched. All done!
    deactivate Agent Thread 1
By decoupling the Agents from the Function invocation with a Storage Account Queue, the integration ensures the Function can scale out as needed to support the calls. It also supports long-running Functions that might be orchestrated with Durable Functions to support stateful workflows for your business logic.
Tying together the AI Agent and Azure Function
You already know the communication is over Storage Queues, so this just highlights what’s tying them together. Assume they share a Storage Account Queue. They both also are setup to use an input queue status-input-queue and output queue status-output-queue.
The following section is used to provide contextual comments to better understand the requirements on both the AI Agent service side and Azure Function side. DO NOT COPY or run this section.
For the AI Agent, it’s the tools specification at Agent creation that matters. (Using the Python SDK to annotate with contextual comments):
1
2
3
4
5
6
7
8
9
10
11
12
13
14
15
16
17
18
19
20
21
22
23
24
25
26
27
28
29
30
31
32
33
34
35
36
37
38
39
40
41
42
43
agent = project_client.agents.create_agent(
  headers={"x-ms-enable-preview": "true"}, # Currently required as AI Agent service is in preview
  model="gpt-4o-mini", # Any model deployment available to the AI Agent service
  name="function-created-agent-project-manager", # This descriptive name is up to you
  instructions="You are a helpful project manager who reports on project status.", # The instructions for the Agent
  tools=[ # You can specify multiple tools, but for this example it is using a single Azure Function
    {
      "type": "azure_function",
      "azure_function": {
        "function": {
          "name": "GetProjectStatus", # The name of the Azure Function. Though triggered by
                                      # the queue message, this descriptive name helps the Agent
                                      # determine when and how it should be used in conjunction
                                      # with the description below.
          "description": "Retrieves the current status of the specified project.",
          "parameters": {
            "type": "object",
            "properties": { # If your Function expects parameters, they should be defined here. The
                            # Agent will match this specification, so the function can check the
                            # received message for the values of these properties.
              "Project": { "type": "string", "description": "The project name whose status is requested." }
            },
            "required": ["Project"] # We require a project name, but not all functions require parameters.
          }
        },
        "input_binding": {
          "type": "storage_queue",
          "storage_queue": {
            "queue_service_uri": "https://mystorage.queue.core.windows.net", # The Storage Account Queue Service URI
            "queue_name": "my-input-queue" # The input queue (must match Azure Function trigger)
          }
        },
        "output_binding": {
          "type": "storage_queue",
          "storage_queue": {
            "queue_service_uri": "https://mystorage.queue.core.windows.net", # The Storage Account Queue Service URI
            "queue_name": "my-output-queue" # The output queue (must match Azure Function output)
          }
        }
      }
    }
  ]
)
For the Azure Function, it’s that the function described is setup to be triggered by Storage Queue and respond via Storage Queue (using the Python SDK and contextual comments):
1
2
3
4
5
6
7
8
9
10
11
12
13
14
15
16
17
18
19
20
21
22
23
24
25
26
27
28
29
30
31
@app.function_name(name="GetProjectStatus") # Matches the agent tool specification
@app.queue_trigger( # Function triggered when messages are available
  arg_name="request",
  queue_name="my-input-queue", # Matches the agent tool specification
  connection="STORAGE_QUEUES_CONNECTION") # Functions expects a setting name of
                                          # "STORAGE_QUEUES_CONNECTION__queueServiceUri" to be set,
                                          # and it uses convention here to only require the first bit.
@app.queue_output( # Output binding to a storage queue when finished
  arg_name="response",
  queue_name="my-output-queue", # Matches the agent tool specification
  connection="STORAGE_QUEUES_CONNECTION") # See note on the trigger.
def get_project_status(request: func.QueueMessage, response: func.Out[str]) -> None:
  # Decode the Storage Queue message (UTF-8 encoding), and load as JSON object
  message_payload = json.loads(request.get_body().decode("utf-8"))
  # Grab any expected parameters -- always CorrelationId
  correlation_id = message_payload["CorrelationId"]
  project_name = message_payload["ProjectName"]

  # Do some work...
  current_status = random.choice(["Active", "Completed", "Cancelled", "On Hold"])

  # Create the response. Don't forget that `Value` must be a string and always
  # include your entire response in `Value`. `CorrelationId` is also always
  # required to ensure the right Agent/thread pick up the response.
  result = {
      "Value": f"Project {project_name}'s current status is: {current_status}",
      "CorrelationId": correlation_id,
  }
  # Message formatted for a Storage Queue -- string with UTF-8 encoding
  result_message = json.dumps(result).encode("utf-8")
  response.set(result_message)
Important: the return message matters! Be sure that the message you enqueue in the outbound queue is a json object that matches the schema:
1
2
3
4
5
6
7
8
9
10
11
12
{
  "type": "object",
  "properties": {
    "Value": {
      "type": "string"
    },
    "CorrelationId": {
      "type": "string"
    }
  },
  "required": ["Value", "CorrelationId"]
}
For example if your function needs to return an object instead of just a string:
1
2
3
4
{
    "Value": "{ \"response\": \"This is my response object, but it has to be a string.\" }",
    "CorrelationId": "this-comes-from-the-trigger-message-but-don't-forget-it!"
}
In short, the AI Agent service expects Value to only be a string when it is processing the response from the Function. You can use a JSON object as long as it is in string format, but a structured output is not required.
The rest of the bits are really making sure the actual resources exist, have identities, and have permissions to interact with the other resources so that the queue-based integration can work as expected.
Let’s see it in action
1
2
3
4
5
6
7
8
9
10
11
12
13
14
15
16
17
18
19
20
21
22
23
24
25
26
27
28
29
30
31
32
33
34
35
36
37
38
# Create a thread on the Agent

THREAD_ID=$(az rest --method post \
--resource "https://ml.azure.com/" \
--url $AI_AGENT_ENDPOINT/threads?api-version=$API_VERSION \
--body "" \
--query id --output tsv)

# Ask a question that requires a response from the Function

az rest --method post \
--resource "https://ml.azure.com/" \
--url $AI_AGENT_ENDPOINT/threads/$THREAD_ID/messages?api-version=$API_VERSION \
--body "{'role': 'user', 'content': 'What is the status of the Widget Whirlwind project?'}"

# Run it and review the results

RUN_ID=$(az rest --method post \
--resource "https://ml.azure.com/" \
--url $AI_AGENT_ENDPOINT/threads/$THREAD_ID/runs?api-version=$API_VERSION \
--body "{'assistant_id': '$AGENT_ID'}" \
--query id --output tsv)

# Poll run status until it's completed

az rest --method get \
--resource "https://ml.azure.com/" \
--url $AI_AGENT_ENDPOINT/threads/$THREAD_ID/runs/$RUN_ID?api-version=$API_VERSION \
--query "{Assistant: assistant_id, Thread: thread_id, RunStatus: status"} \
--output table

# Get the results of the run

az rest --method get \
--resource "https://ml.azure.com/" \
--url $AI_AGENT_ENDPOINT/threads/$THREAD_ID/messages?api-version=$API_VERSION \
--query "reverse(data[].{Role: role, Message: content[0].text.value})" \
--output table
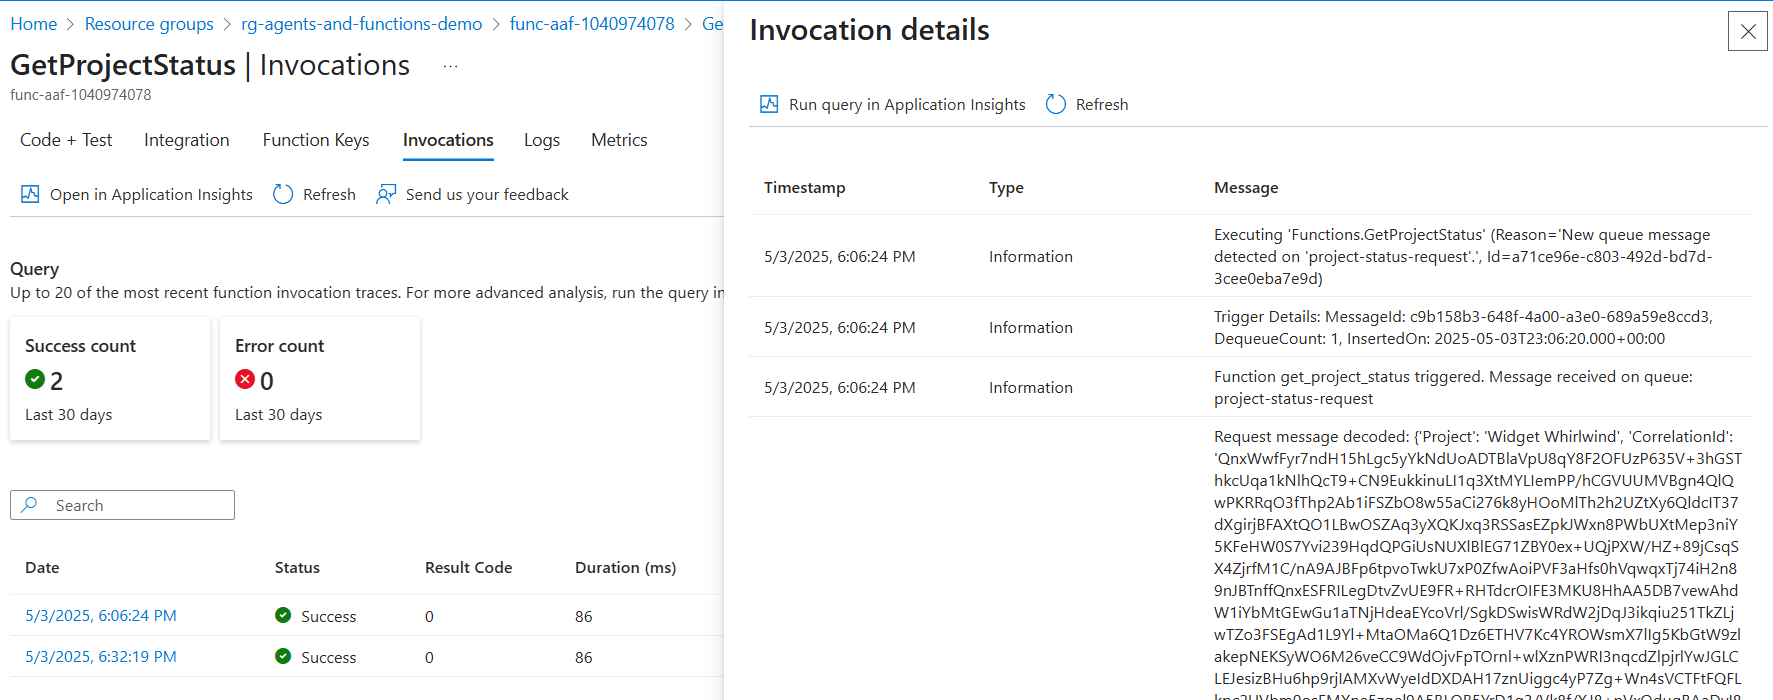
Don’t believe it’s calling your Function? Let’s double check. You can go to the portal to navigate to the Function Invocations log to see the results of the run. The invocations log may take up to five minutes to display invocation data.
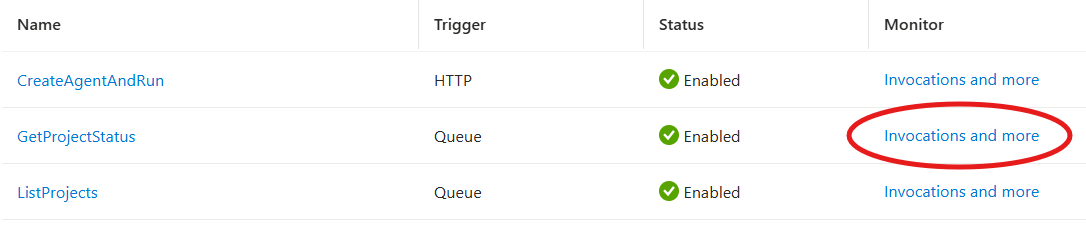
The invocation view will show the runs (successful or in error), and you can click on the invocation date to show the details:
Closing thoughts (and azd shortcut)
You now know how to setup an Azure AI Agent service that can automatically call Azure Functions. Congrats! If you’re finished playing and testing, don’t forget to cleanup your resources (e.g., az group delete -n $RESOURCE_GROUP).
If this feels like a lot to manually reproduce and you just want an easy end-to-end deployment, we’ve got you covered.
- Make sure you have the Azure Developer CLI installed.
- Visit the Awkward Industries GitHub repository agents-and-functions-blog and clone it locally.
- Run
azd up. - Enjoy, and run
azd downwhen you’re finished.
Hopefully this demystifies the integration and shows how easy it can be to add your own custom Azure Functions to an AI Foundry Agent service. Happy hacking!